Enabling The Delete Button After Recent Gmail Update

/ Thursday, June 6, 2013 /
With the latest Gmail update for Android, the delete button was removed by default. To delete you can press your options key while in an email and that will show the delete option.

You do have the option to archive but not the option to delete unwanted messages.

This is a bit time consuming when trying to remove emails that you do not want to read and just want to delete.


To re-enable the delete option press the options key to bring up the menu (this can be done from inside an email or from the main Gmail screen):


Select General settings:


Select Archive & delete actions and select the action that you want:


One thing to note is when selecting Show delete only, you will have the option to Swipe to delete. I selected Show delete only since I do not archive my emails. 

Now in the same email I have the trash can icon to delete that email:


Also from the main Gmail screen I can now long press to select an email and get the same trash can icon or I can swipe to delete my email messages now. 


I tested this on Android 4.1.2 and Android 4.1.1.

CompTIA Linux+ Basic File Structure

/ Sunday, June 2, 2013 /
I am currently studying to get my Linux+ certification after receiving the MTA Network Fundamentals Certification and the CompTIA Network+ certification. This for me is a bit difficult as I do not spend much time in Linux as my job requires the knowledge of Windows based systems.

To help me remember the general file structure of *nix systems I have created flash cards that I am using to help me study. This in no way is a complete list and I will update this accordingly when I have time and come across new information.

If any information is incorrect or could be phrased differently please let me know and I will update accordingly.


/usr
What Directory is the location for mn pages, documents, sample templates, config files, etc? /usr/share

What directory contains additional user executable commands?
/usr/bin

What directory contains header files for the C language?
/usr/include

What directory holds additional system administrator commands?
/usr/sbin

What directory is a repository for storing commands and tools that system administrators download from the web, in house, or get else where?
/usr/share
/var

What directory holds print jobs, cron jobs, email message, and other queued data prior to sending?
/var/spool

What directory holds temporary files for an extended amount of time (more than what is allowed in /tmp)?
/var/tmp

What directory contains the user mailboxes?
/var/spool/mail

What directory contains system logs, boot logs, failed user logs, installation logs, cron logs, mail logs, etc?
/var/log


What directory contains files holding logs, status, spool, and other dynamic data?
/var
Other Directories
What directory is used if AutoFS is used to mount NFS file systems using a special map? /net


What directory holds server data associated with databases, web sites, and other server data?
/srv


What directory holds most system configuration files?
/etc


What directory contains commands required at system bood and most commands requiring root priveledges?
/sbin


What directory holds shared library files required by the kernel and other programs?
/lib


What directory holds crucial user executable commands and holds static data files?
/bin


What is the top level file system directory?
/

What directory holds orphaned files after a system crash?
/lost+found

What is the default home directory for the root user?
/root

What folder contains the Linux kernel, boot loader, boot configuration files, and other files required to boot?
/boot

How to create a simple Drupal 7 theme from scratch Part Two

/ Friday, September 28, 2012 /
       So in the last iteration of theming Drupal 7 from scratch with a bare bones template we covered the page.tpl.php, the base.info file and a blank basesite.css file that did absolutely nothing for us.


    As you can tell the base site is very basic with no color other than the admin panel and everything is stacked on top of each other. We are going to concentrate on adding CSS to format the site in the way that we want it at a basic (still plain) level.


       I have my basesite folder setup with these files. The files I have added since the last tutorial were the logo.png and the screenshot.png. I was initially using JPEG images for my logo and screenshot but the images would not load on the site until I changed the file over to PNG. I prefer the png format overall so this works better for me but I do not know why the JPG images were not loading.

       The logo.png is the logo that will appear on your site and is required to be named logo or the php will not grab the image. Im sure that we could change the $logo to whatever else but logo is a definitive term that will help to keep larger sites organized. The same goes with the screenshot.png, this has to be labled screenshot or the admin console will not pull it up.


       This is the updated page.tpl.php file to wrap the components into div tags to organize the overall layout of the site. This updated file does nothing until the basesite.css file is updated. 
   

       The basesite.css file hase evolved quite a bit. From the first site to get the content organized in a proper format that is easier on the eyes and more user intuitive.

      I like to organize my Css files the best I can as I am coding them to make sure that they flow well with the site and there are cases when the previous set of Css will overwrite the new Css code if you do not use an Important flag.

       The .header aligns the image to the center of the monitor and adds a 15 pixel border to the bottom of the header region.  Its not much Css but its effective.


The .contentstuff is for the main content and is setup as a float so that it will sit next to the .left sidebar. I addedd padding to get the main content to space it away from the footer region.


       The .leftsidebar if for the sidebar that holds the navigation pane, login , and search. This region is setup under your  structure and then blocks. This is setup as a float so that it will sit to the far left. I addedd padding to get the sidebar  to space away from the header region.


       For the .footer I created a box to encapsulate the information that I have stored in the footer area like Who's online and what not. One thing that is really important for this region is the "clear: both;" that I added on the first line. This clears the floats from the leftsidbar and the contentstuff so that it appears in the bottom of the screen as intended.


The entire Css file is below:


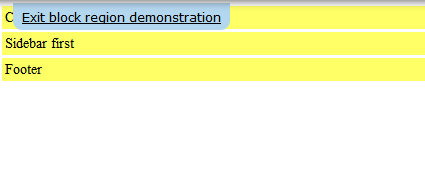
       The site now looks like the following image:


       The site is still basic but it is starting to take shape. I will try to get the next iteration of this tutorial out this upcoming week. Maybe we will add a repeating background, link click colors and things like that. Thanks for reading.


How to create a simple Drupal 7 theme from scratch

/ Tuesday, September 18, 2012 /
       So I have been working on a Drupal 7 website and decided that I wanted to build one from scratch without the use of a template to meet the need that I have. I have done a bit of HTML coding but PHP is a new game all together for me. It has been a learning experience that I have benefited from.


       I wanted to show other on how to configure a Drupal 7 website with mainly CSS and a little bit of PHP to format the site like you need to. I will break this up into multiple parts so that it is easier to read and follow along with. 


       For this tutorial the site needs to be placed into the "F:\wamp\www\drupal\themes" of your web server. I am using WAMP in this case but you could use Acquia, XAMMP, or whatever else you are comfortable with. 


      The .info file is what tells Drupal that you are using a custom theme and what features the theme will have. You will notice that the name is the same as the info file. This naming needs to match what you named the folder for your site. In this case I named my site basesite.

     You do not have to put a version but I did for fun, but you do have to put the core version. If you are making a site for previous releases of Drupal then this needs to go into the core line. 

     The Stylesheets line lets you specify what pages the style sheet can affect and what folder location the style sheet is located in. I just put mine in the same directory since this is going to be a test site for these blog post. 

     Regions are the areas where your features such as a header, search, login, main content, features or anything else will be places. From what I understand if you do not specify these options then it will default to the Drupal core defaults. 

basesite.info


       The page.tpl.php file is kind of like your general HTML file with all of your markup, but instead of adding your general text, pictures, and content you will place the php required for Drupal to manage your content and images as specified in your configuration.

       The only PHP that i have in this page is the content, sidebar_first, and the footer. As noted in our info file we can add more regions but I wanted to keep this simple.

page.tpl.php

       I know the CSS file is blank but I am wanting to display a simplified version of some of the fantastic Drupal sites that we have seen out there. We will add more to this file later on in later blog post. 

CSS file

       After you save these files to your themes folder and name them accordingly you should get the following version of a simplified site.

       This base template is a great template for one to start out with to play with different techniques prior to adding the content required for a fully functional site. 

       I had previous content from another site that I was working on and this is just test content from Microsoft about user accounts in Server 2008 R2. 


       Another thing that should be noted is that there is the options to "Demonstrate block region" to validate your regions are setup the way that they should be. You can access this in the admin menu under Structure and then click on blocks. You will notice that in the above screen shot I have no Footer, this is due to me not setting a footer for this page. It shows us the layout between the page.tpl.php and css files. Its a useful tool if you are having issues placing your regions. 


Getting Drupal 7.x to work with Dreamweaver

/ Friday, September 14, 2012 /
I was looking into getting a Drupal site to work with Dreamweaver CS 5.5 and found a few tutorials to get my site to load into Dreamweaver but could never get the Live View to display properly for some reason or I would get a page can not be displayed error message. I set up the server multiple times and found that even with full permissions in Apache it still made no difference.


I will cover the way I was able to get my Drupal site to work with Dreamweaver.


1. Click Site.
2. Click New Site... or Manage Sites... if you already have a site setup


3. Name your site in the Site Name field.
4. Select your Local Site Folder. (I was able to get mine to work by selecting the root folder of my theme)


5. Click Server.
6. Click the + to add a new server.
7. Name the Server.
8. In the Connect using drop down select Local/Network
9. Select the Drupal directory for the server folder.
10. Use the local host address for the Web URL + the Drupal folder.


11. Click Advanced.
12. Under Testing Server select PHP MySQL for the Server Model.
13. Click Save.


14. In the Site Setup for window take the check mark out of Remote and put a check mark in Testing.
15. Click Save.


After setting up the server You will find the new site in your FILES list on the lower right of the Dreamweaver window. Once selecting your page.tpl.php file you may see a Dynamically-related files message.


Click discover and you should not get any messages. If you do get an error message verify the configuration of your local web server. 

Another thing to make note is if you do not have your services running on the web server then you will get an unknown error message when trying to connect. 

If everything connects just fine then click the Live View button. More than likely you will get a Forbidden page error message stating that you do not have access to your page.tpl.php page. You are not trying to access that page and are really trying to access the Drupal site. 


In the Dreamweaver address bar take out the "page.tpl.php" in the address and press enter. If everything goes right you should be able to see your Drupal site in Dreamweaver using the Live View mode. 


This does not automate Drupal theming but it will help in getting everything setup in the way that you want it to be setup faster (my opinion) than if you were using a text editor. Notepad++ is also an excellent tool for editing Drupal themes if you do not have access to Dreamweaver.

Command prompt un-installation errors

/ Thursday, September 6, 2012 /
I recently wrote some batch scripts to uninstall software and delete registry keys for my work.

I used the command in the script of:

wmic product where name="Software Name" call uninstall /nointeractive

This command did what it was supposed to as far as removing the software, but it still left the Add/Remove program entries. I did not think anything of it until I went to re-install.

The problem came up that I was unable to run the software installer again. I received a feature transfer error 1603 when trying to  uninstall through Add/Remove programs and a error code of 1628 installation error

The only thing that I could think of on why the installer wouldn't complete was due to existing registry keys left over from install shield. I created a virtual machine, installed the software that was trying to install and launched the WMIC console.

In the WMIC console I types "product" to bring up a list of everything that has a MSI installer attached to it. This takes a bit to run if you have a lot installed on your PC. After the product command has completed you can scroll to the right and you will see the install shield reg value.

I used the REG DELETE command to remove that registry entry. Now I can uninstall the software from the command line with a batch file and re-install like normal.

Double check the installer code with the WMIC console to ensure the software install code did not change.


Hopefully this helps anyone that comes across this issue.

Full Screen on Click Code for for full screen Security Cameras in a web browser

/ Saturday, August 11, 2012 /
I was working with my previous code from my MJPEG over HTTP Streaming in a web browser and wanted to add features like single click to bring a camera in full screen and double click to bring everything back to normal. I was originally going to use javascript to accomplish this but was thinking that there was a simpler way to do this without needing to use java script.
I went to W3 Schools and started browsing around for any HTML that dealt with mouse clicks and found that "onclick" and "ondblclick" was exactly what I was looking for.

I tried to use onmouseover and onmouseout but that ended up being really twitchy and would not leave the camera in full screen.

I initially did not hide the other cameras but due to my div tag aligning to the center this made it very difficult to select the correct camera because the alignment of the images.

The following line of code is how I was able to get the video to display full screen (1280x720) on mouse click and to get back to the normal image on double-click. I did this for all three of my cameras and it works perfect for me.

You will notice that the onclick includes the names of the other cameras with no input for the height and width just using single quotes. This is what causes the camera to "disappear" and with the on double click the camera names have their original frame sizes that they were to begin with. You have to include the data in both the onclick and the ondblclick or the images will disappear and not come back on dblclick. Try it out and let me know how it works for you.

I will be working on using some JQuery to have the images sequence on button press that should work fairly well. I tested it with an old JQuery image rotator that I had programmed for one of my web design classed and it worked as intended.


Thanks for looking!!!


About Us

 
Copyright © 2010 DomGonzales Random IT Blog, All rights reserved
Design by DZignine. Powered by Blogger